FUNGSI TERBILANG (MS.EXCEL)

Trik membuat nilai terbilang pada Excel 2007 adalah sangat simple mudah. Ini bukanlah hal yang baru dan berbeda dari yang lain, hanya mempermudah dan membuat lebih simple untuk dipraktekkan. Yaitu dengan memotong beberapa tahap yang dilalui dan langsung ke TKP.
Untuk membuat tulisan terbilang dari suatu angka secara otomatis (tanpa mengetik manual) dalam excel inilah caranya yang paling simple:
1. Download file addins excel untuk terbilang disini..
2. Simpan/save file tersebut di computer (misal di c:\My Documents)
3. Buka aplikasi Excel 2007 anda,
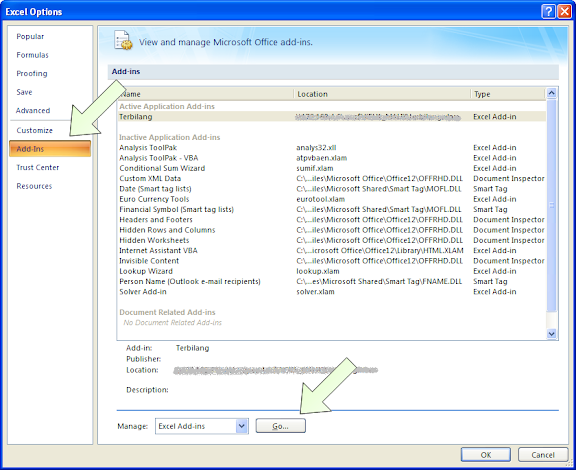
4. Masuklah ke office button (pojok kiri atas) – lalu klik tombol “Excel options”

5. Pilih tabs “Add-Ins”, lalu klik tombol “Go…” yang berada pada bagian bawah panel form.

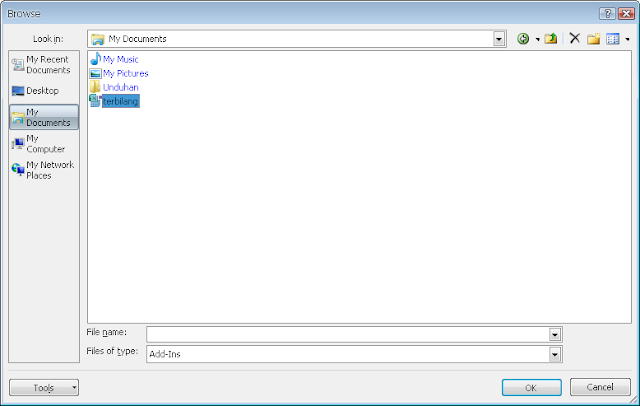
6. Setelah muncul kotak berikut tekan pada tombol “Browse”.


7. Pilih direktori tempat anda menyimpan file unduhan tadi (misal di c:/My Documents)

8. Klik tombol “Ok” lalu akan muncul kotak berikut:


9. Klik Ok lagi untuk menyeselaikan proses pemasangan Add-Ins
Sekarang kita check apakah fungsi tersebut berfungsi. Untuk memakainya anda perlu mengetahui formulanya. Missal angka yang hendak anda buatkan terbilangnya ada di cell “A1”, maka formulanya adalah sebagai berikut:
=terbilang(A1,4,”Rupiah.”)
Penjelasan formula tersebut adalah sbb.:
1. A1 adalah cell tempat angka yang akan dikonversi ke nilai terbilang.
2. 4 adalah style case, anda dapat memilih 0,1,2,3,4 untuk menampilkan style penulisan yang berbeda.
3. “Rupiah.” Adalah text keterangan mata uang, dapat diganti dengan mata uang lain yang anda perlukan dengan cara manual.
Anda juga dapat mencoba cara lain dengan mengetikkan “=terbilang()” tanpa spasi, di cell edit bar seperti berikut, lalu tekan tombol “fx”
Maka akan muncul kotak dialog seperti berikut:

Coba masukkan nilai-nilai yang sesuai pada fungsi tersebut dan lihat hasilnya..

Trik ini tidak hanya berlaku untuk Excel 2007 melainkan untuk versi lain juga dengan prinsip yang sama. Yaitu anda harus mencari menu untuk menginstall Add-Ins baru. Selamat mencoba, semoga bermanfaat.
SUMBER:http://abunaweed.blogspot.com/2010/04/cara-mudah-membuat-fungsi-terbilang.html

How to modify styles in Microsoft Word

Word has dozens of built-in styles. But the pre-set formatting may not suit your needs. For example, in Word 2002 and Word 2003, Word's default Body Text is Times New Roman, 12pt. In Word 2007 and Word 2010 it's 11pt Calibri. Perhaps you'd rather it was 11pt Century Schoolbook, or 10pt Lucida Sans.
You can modify any of Word's built-in styles. This page describes two different methods for modifying paragraph or character styles:
  • modify a style using a dialog box
  • modify a style by example.
In either case, you'll need to know what version of Word you have. If you're not sure, see What version of Word do I have?

Use a dialog box to modify a style (Method 1)

Open the Modify Style dialog

If you're using Word 95, 97 or 2000:
  1. From the main menu, Format > Style.
  2. In the Styles list, choose the style you want to Modify. If you can't find the style you want to modify, in the Category box, choose "All Styles". (Tip: You can see a description of the style below the Preview.)
  3. Click Modify. You're now at the Modify Style dialog.
If you're using Microsoft Word 2002 or Word 2003:
  1. From the main menu, Format > Styles and Formatting.
  2. In the panel, find the style you want to Modify. (Note: If you don't see the style listed, under Show, choose All Styles. If you still don't see your style listed, under Show, click Custom, tick your style and click OK. Then, choose All Styles.)
  3. Right-click on the style name and choose Modify. You're now at the Modify Style dialog.
If you're using Microsoft Word 2007 or Word 2010:
  1. If you're a keyboard junkie: do ctrl-Shift-S. That opens the Apply Styles pane. Use the drop down list to select a style or type the style name into the box. Tab to the Modify button and press Enter. You're now at the Modify Style dialog.
  2. If you're a mouse user: on the Home tab, in the Styles gallery, right-click the thumbnail for the style you want to modify and choose Modify. You're now at the Modify Style dialog.
  3. If you could not find your style that way, then you need the Styles pane. Press Alt-Ctrl-Shift-S to open the Styles pane. Or, click the dialog launcher (the little tiny arrow) at the far bottom right of the Styles group. That pops open the Styles pane. At the bottom of the Styles pane, click Options and choose to show All styles. Back in the Styles pane, find your style in the list, right-click and choose Modify. (Yes, Virginia: Microsoft adds more built-in styles to every version of Word. And with every version, makes it harder to find them!)

Modify your style

Automatically update?
If Automatically Update is ticked, un-tick it. There is not enough aspirin on the planet to cure all the headaches this causes when it is ticked!
  • From the Modify Style dialog you can change:
    • The base style for your style (which controls how styles cascade).
    • The style to use for the following paragraph. (For example, perhaps you frequently type a paragraph using the Title style, and you follow it with a paragraph in style Subtitle. You can modify the style Title to be followed by style Subtitle.)
    • If you tick Add to template, your change will be saved in the template on which this document is based.
  • In the Modify Style dialog, click Format. Choose one of the characteristics of the style to modify: Font, Paragraph etc.
  • Make your changes and click OK, OK and either Apply or Close.

Modify a style by example (Method 2)

This method of modifying a style does not use the Modify Style dialog box. Instead, you make the changes right in your text, then tell Word to update the style to reflect those changes.
  1. Ensure that you have ticked the box at Tools > Options > Edit > Prompt to Update Style.
  2. Put your cursor in a paragraph of the style you want to modify. So if you want to modify the style Body Text, put your cursor in a paragraph of Body Text style.
  3. Use Format > Font, Format > Paragraph, Format > Borders and Shading etc to make the required changes.
  4. If you're modifying a paragraph style, click within the paragraph (so no text is selected) or, select the whole paragraph (triple-click to select the whole paragraph). If you're modifying a character style, select one or more characters in that character style.
  5. From the "Styles" box on the Formatting toolbar, re-choose the name of the style. Word will ask if you want to update the style, or reapply the current style to the selected text, as shown in Figure 1. If you want to say sane, do not tick the Automatically Update Style box.
If you reapply a style using the Styles box on the Formatting toolbar, Word asks if you want to update the style. Figure 1: If you want to stay sane, do not tick the Automatically Update Style box.
Note: Word's help just says to "reapply the style". There are many ways to apply a style. The only ways to make Word ask if you want to re-define the style are either to choose from the Styles box or (in Word 2002 and Word 2003 only) to use the Format > Styles and Formatting pane.
A note on modifying styles and their numbering
You can modify the numbering or bullets of your style by using this "by example" method. However, be very careful! When you get to the Bullets and Numbering dialog that shows 8 example numbering schemes, always choose the one that is already highlighted. The other suggestions about outline numbering also apply to modifying numbering by example.

sumber:http://www.shaunakelly.com/

PERINTAH CEPAT DI MICROSOFT WORD

Keyboard Shortcut adalah melakukan perintah cepat di Microsoft Ofice Word  dengan menekan satu tombol atau kombinasi beberapa tombol pada kibor.

  • Home = Memindah kursor ke awal baris
  • End = Memindah kursor ke akhir baris
  • Insert = Menempel salinan atau pindahan (lihat penjelasan)
  • Page Up = Menampilkan satu jendela ke atas
  • Page Down = Menampilkan satu jendela ke bawah
  • Num Lock = Menghidupkan/mematikan keypad angka
  • Esc = Membatalkan perintah terakhir/menutup kotak dialog
  • Tab = Menggeser teks 1 tab, atau berpindah dari satu drawing terpilih ke drawing berikutnya
  • Backspace = Menghapus satu karakter di sebelah kiri kursor
  • Caps Lock = Mengaktifkan tombol menjadi huruf KAPITAL
  • Delete = Menghapus satu karakter di sebelah kanan kursor
  • F1 = Menampilkan pertolongan
  • F2 = Memindah teks
  • F4 = Mengulang aksi terakhir
  • F5 = Menuju ke ... = “Ctrl” “G”
  • F6 = Berpindah ke frame berikutnya
  • F7 = Mengecek ejaan
  • F8 = Menghapus teks terpilih
  • F9 = Memperbaharui field
  • F 10 = Memunculkan huruf jalan pintasan (shortcut) pada menu atau toolbar
  • F 11 = Berpindah ke Field berikutnya
  • F12 = Simpan berkas dengan nama baru (Save As)
  • Ctrl 0 = Menaikkan atau menurunkan 1 spasi
  • Ctrl 1 = Membuat teks terpilih menjadi berspasi 1
  • Ctrl 2 = Membuat teks terpilih menjadi berspasi 2
  • Ctrl 5 = Membuat teks terpilih menjadi berspasi 1,5
  • Ctrl A = Memilih seluruh teks
  • Ctrl B = Memberi efek tebal pada teks terpilih
  • Ctrl C = Perintah salin
  • Ctrl D = Memunculkan menu Huruf (Font)
  • Ctrl E = Mengetengahkan teks terpilih
  • Ctrl F = Perintah mencari kata tertentu
  • Ctrl G = Menuju halaman tertentu
  • Ctrl H = Mengganti teks dengan teks yang lain
  • Ctrl I = Teks yang terpilih menjadi miring atau kembali
  • Ctrl J = Teks yang terpilih menjadi rata kanan kiri
  • Ctrl K = Membuat hipertaut (Hyperlink)
  • Ctrl L = Teks Rata Kiri
  • Ctrl M = Menggeser tepi kiri teks (Indentation) ke kanan. Mengembalikan “Ctrl” “Shift” “M”
  • Ctrl N = Membuka berkas baru
  • Ctrl O = Mencari dan membuka berkas yang telah dibuat
  • Ctrl P = Perintah mencetak (mengeluarkan menu pencetakan)
  • Ctrl Q = Menghapus format paragraf
  • Ctrl R = Teks Rata Kanan
  • Ctrl S = Simpan (menyimpan berkas)
  • Ctrl T = Menggeser baris menggantung ke kanan. Mengembalikan “Ctrl” “Shift” “T”
  • Ctrl U = Memberi garis bawah teks yang dipilih
  • Ctrl V = Paste. Menempatkan salinan atau pindahan
  • Ctrl W = Menutup jendela
  • Ctrl X = Cut. Memindahkan bagian yang dipilih
  • Ctrl Y = Redo. Lawan Undo (membatalkan Undo)
  • Ctrl Z = Undo (membatalkan perintah editing terakhir)
  • Ctrl = = Subskrip Ctrl Shift + = Superskrip
  • Ctrl F1 =
  • Ctrl F2 = Print Preview
  • Shift F3 = Mengubah kasus huruf (Change Case)
  • Ctrl Shift A = Mengubah teks terpilih menjadi KAPITAL atau kembali ke bentuk sebelumnya.
  • Ctrl Shift B = Mengubah teks menjadi tebal atau sebaliknya
  • Ctrl Shift C = Mengopi format (Copy Formatting)
  • Ctrl Shift D = Memberi garis bawah dobel
  • Ctrl Shift E =
  • Ctrl Shift F = Mengubah/memilih model huruf skrip
  • Ctrl Shift G = Menampilkan statistik jumlah halaman, kata, karakter, garis, dan lain-lain.
  • Ctrl Shift H = Menghapus teks terpilih
  • Ctrl Shift I = Memiringkan teks terpilih = “Ctrl” “I”
  • Ctrl Shift J = Karakter memenuhi jendela (Distribusi)
  • Ctrl Shift K = Mengubah teks terpilih menjadi SMALL CAPS (huruf kapital berukuran kecil, dan
  • awal kata huruf kapital normal)
  • Ctrl Shift L = Daftar berbulir (Bullets)
  • Ctrl Shift Q = Mengubah karakter terpilih menjadi simbol 
  • Ctrl Shift V = Menempel Format (Paste Formatting)
  • Ctrl Shift W = Memberi garis bawah tiap kata
  • Ctrl Alt V = Menempel Spesial (Paste Special)   

    sumber:http://arivay.blogspot.com/2012/03/jalan-pintas-kibor-atau-perintah-cepat.html

MEMBUAT DAFTAR ISI


Kita mungkin lebih sering fokus pada isi dokumen ketimbang bagian lain yang juga penting, seperti daftar isi. Sehingga bagian ini sering dikerjakan belakangan dan kadang karena diburu waktu, kita tidak sempat memperbaikinya bila ada perubahan pada dokumen. Hal di atas sering terjadi bila membuat daftar isi secara manual. Oleh sebab itu, ganti cara manual dengan fitur yang sudah disediakan oleh Microsoft Word. Fitur ini dapat membantu membuat daftar isi dengan cepat dan seandainya ada perubahan pada nomor halaman dan judul dalam dokumen, kita dapat melakukan update daftar isi dengan beberapa perintah sederhana saja.
Menandai Bagian untuk Daftar Isi
Sebelum membuat daftar isi, kita perlu menandai bagian-bagian mana saja yang akan ditampilkan dalam daftar isi. Bagian tersebut biasanya berupa heading atau judul bab, contoh: Bab 1 Pengantar, 1.1 Pengenalan Microsoft Office 2007, dan sebagainya. Cara mudah untuk membuat heading adalah menggunakan heading styles yang sudah disediakan (built-in sytles) oleh Microsoft Word, yaitu Heading 1 sampai dengan Heading 9. Lebih jelasnya tentang cara menggunakan Styles, dapat dibaca di artikel ini: Menggunakan Styles di Word 2007: Untuk Menjaga Format yang Konsisten pada Dokumen. Selain menggunakan built-in sytles, kita juga dapat membuat daftar isi berdasarkan custom styles yang kita gunakan, misalnya style yang kita buat sendiri.
Cara Membuat Daftar Isi
Setelah menandai bagian untuk daftar isi, maka bisa dilanjutkan ke tahap pembuatannya.
      Membuat Daftar Isi dari Built-In Heading Styles
   1. Gunakan cara ini bila dokumen menggunakan heading styles seperti Heading 1, Heading 2, dan seterusnya. Klik pada bagian halaman yang ingin ditaruh daftar isi (biasanya di awal dokumen).
   2. Pada References tab, Table of Contents group, klik Table of Contents, pilih gaya daftar isi yang diinginkan.
   3. Format tampilan daftar isi.

      Pada References tab, Table of Contents group, klik Table of Contents dan kemudian klik Insert Table of Contents untuk mengatur hal-hal berikut:
          * Tab leader, untuk membuat tab leader antara teks dan nomor halaman, antara lain: garis putus-putus, titik-titik atau tidak menggunakan tab leader.
          * Formats, untuk memilih format tampilan daftar isi, seperti: template dokumen (sesuai dengan format yang kita buat), atau format lain yang sudah disediakan oleh Microsoft Word seperti Classic, Fancy dan sebagainya.
          * Show levels, ganti angka pada kotak di sampingnya untuk menambah/mengurangi level heading yang akan ditampilkan dalam daftar isi.
      Membuat Daftar Isi dari Custom Styles
   1. Gunakan cara ini bila menggunakan custom style pada heading untuk daftar isi, contoh: Title style atau style yang kita buat sendiri. Klik pada bagian halaman yang ingin ditaruh daftar isi.
   2. Pada References tab, Table of Contents group, klik Table of Contents, dan kemudian Insert Table of Contents.
   3. Klik Options.
   4. Di bagian Available styles, pilih style yang digunakan untuk heading dalam dokumen dengan mengisi angka pada kotak di TOC level.
   5. Pada TOC level, isi angka 1 sampai 9 untuk menentukan level pada heading style.
      Catatan: Jika menggunakan  custom styles, hapus angka TOC level untuk built-in styles, misalnya: Heading 1.
   6. Ulangi langkah 4 dan 5 untuk setiap heading style yang ingin disertakan dalam daftar isi.
   7. Klik OK.
Cara Update Daftar Isi
   1. Pada References tab, Table of Contents group, klik Update Table.
      Atau klik di bagian daftar isi sehingga muncul tampilan seperti di bawah ini dan klik Update Table.
   2. Klik:
          * Update page numbers only, bila perubahan hanya pada nomor halaman karena jumlah halaman bertambah/berkurang atau format nomor halaman berubah.
          * Update entire table, bila ada penambahan/pengurangan heading atau bila ada perubahan teks pada heading.
Cara Menghapus Daftar Isi
   1. Pada References tab, Table of Contents group, klik Table of Contents.
   2. Klik Remove Table of Contents.
  sumber:http://computer1001.blogspot.com/2009/01/membuat-daftar-isi-table-of-contents-di.html
 
Hamutaro - Hamtaro 6 Hamutaro - Hamtaro 6